
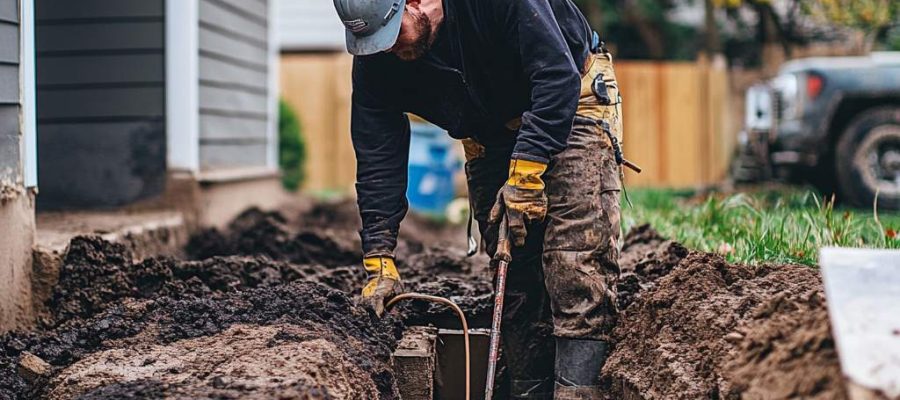
The first construction phase begins with excavating the earth while building a house and will bring you safely to your home. Now it’s finally clear: let’s begin! We are building! So that you can enjoy this phase in a relaxed manner, you should update your knowledge of earthworks and preparatory measures in good time. This way neither time nor cost planning will get out of hand.
Have you already dealt with a geological report and soil samples?
Preparatory measures necessarily include a geological report on your construction site. You can read why this is necessary and how you can have this report drawn up in our blog article on the subject of Subsurface Reports.
It’s very likely that you don’t have just one geological relationship we need, for example, information on the bearing capacity of the subsoil, but also a Soil analysis. The latter is often required by cities and municipalities to determine whether soil is contaminated. However, transporting the excavated earth to the landfill represents a significant cost factor. For the Landfilling of contaminated soil (due to heavy metals or contaminated sites). further additional costs A. Therefore contact the competent authority in time to obtain clarity on the matter.
Digging the earth: reports create safety
The results of the geological survey and soil samples give your family security – after all, it is reassuring to build on soil that is harmless to health – and at the same time form the basis for the calculations of your earthmoving company. With this data it is possible to estimate the complexity of earthworks and which machines must be used to carry them out.
Earthworks during the construction of a house – talk to an earthworks company!
With the reports and analysis results you will have a good basis for your conversation with an earthmoving company. All earthworks for your home are part of the additional construction costs, so they are usually not part of your home manufacturer’s offer. In the interest of your construction budget it is therefore particularly important to accurately record the efforts and costs for earthworks.
If you choose a house supplier like Rötzer Ziegel Element Haus, your supplier will of course also accompany you and advise you in this first phase of the house construction.
The excavation of earth for the basement slab or foundation
If the analysis results are correct and nothing stands in the way of excavating the earth, the excavation work can begin! The following steps await you:
Step 1: Removing the topsoil
Both Excavation works it will be the precious one first Oberboden REMOVED. Clarify with your earthmoving company how much of the humus layer will be removed, whether it will be removed or where it can be stored on your property. Normally they are around 20cm. The removed soil is extremely important because it is reapplied when the job is completed and therefore ensures rapid growth of the grass and plants. If you’re interested in making your new home greener, be sure to handle the potting soil with care.
Step 2: Digging the construction pit with the excavator
Now excavators are used to… excavation pit dig. During subsequent earthworks, in addition to the dimensions of your floor plan, a so-called working area will be excavated all around. This means that the resulting excavation is half a meter larger than the plan. Furthermore, in this context they also have to do so Wastewater channels, tanks, pipes, empty pipes, etc. be dug.
Different land classes – different costs
The costs for excavating the earth depend on the class of the soil. THE seven classes of soils are specified in DIN 18300. They classify soils according to their characteristics: loam, free-flowing soil types, easy-to-remove soil types, medium-difficult soil types, difficult-to-remove soil types, easy-to-remove rocks and difficult-to-remove rocks. Your earthmoving company consults the geological report for the calculation and thus calculates the machines and workers needed for the excavation.
Phase 3: removal and unloading of the excavation
THE Removal of excavated earth usually causes this most important cost item within the earthworks. The excavated soil must be disposed of in appropriate landfills. In recent years the Landfill taxes increased significantly. Disposal of contaminated soil from the excavation becomes even more expensive: based on the soil samples it is necessary to decide what contamination is present and where to dispose of the excavation. Excavation removal and unloading costs are expected to be approximately 30 – 50% of the total earthwork costs.
Step 4: The Filling Work
Only when the Keller built or what is necessary base plate is poured, the last phase of the earthworks takes place: the Filling work. The material is especially important here. Because wherever you later want driveways, driveways or a parking lot for your car, you need to use a material that resists weather-related settling processes.
If you without basement build, earthworks are obviously less extensive and usually cheaper, provided the soil on your property is stable. Your geological report will provide information on this. If this is not the case, the floor will need to be replaced. This is usually not a problem, but it involves significant additional costs. Your earthmoving company will inform you exactly what needs to be done in this case and how the measures will affect the additional construction costs.
The 3 most important points for estimating the cost of excavating earth when building a house
Since costs vary greatly from region to region, for an approximate cost estimate it is advisable to ask an earthmoving company close to the construction site about the following 3 cost items:
- Removing topsoil
- Digging the construction pit
- Departure and unloading of excavated earth
latest posts published

Create an insect hotel in your garden

Find out which lighting to use for each part of your garden

Make a modern fire pit yourself

[Photos] Roof garden terraces

Wooden terrace: which species to choose?

The 10 essential aromatic plants for your garden

4 questions to ask yourself before creating a pond in your garden

My selection of 15 plants with purple foliage
Which natural stone to choose for the flooring of your terrace?
